5 Things Every Landscape Photographer Should Carry At All Times - PhotoNaturalist

5 Things Every Landscape Photographer Should Carry At All Times - PhotoNaturalist


5 Things Every Landscape Photographer Should Carry At All Times

Posted: 30 Oct 2012 02:24 PM PDT

With all those camera accessories available out there, it’s easy to become a gearhead, and lose sight of what’s really important: making photographs.

Although a lot of these accessories just add unnecessary weight to your backpack, there are at least five things that are extremely useful for a landscape photographer:

#1 – Tripod

Okay, this one’s obvious (or at least it should be!). When photographing landscapes, you’ll want a lot of depth of field, which means a high f-number (usually f/11 or higher), which means longer exposures. And, longer exposures mean more sensitiviy to camera shake.

Nothing will keep your camera more still than a tripod. It’s virtually impossible to get sharp landscape photographs without one.

#2 – Polarizing filter

There are three great things that a polarzing filter can do for your landscape photos:

  • Darken or deepen the color of blue skies
  • Eliminate reflections on the surface of water and/or rocks
  • Help reduce incoming light, when you need longer shutter speeds

Here are a few examples of the polarizing filter in action:
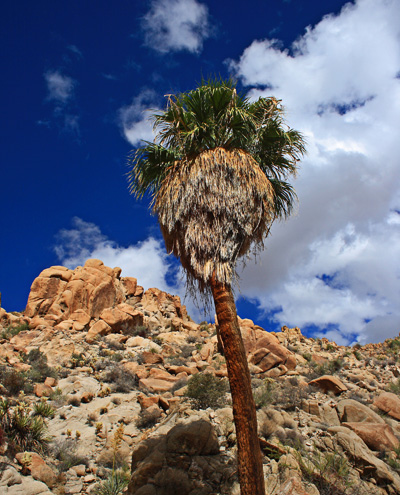
Photo by Steve Berardi

Photo by Steve Berardi

In the photo above of a Desert Fan Palm, I used a polarizing filter to deepen the blue color of the desert sky.

By the way, the Desert Fan Palm happens to be the only species of palm tree that’s really native to California (most of the ones you see in LA and along the coast were actually brought here by the Australians during the gold rush).
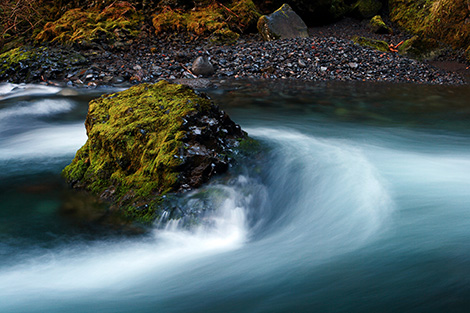
Photo by Steve Berardi

Photo by Steve Berardi

The polarizing filter helped eliminate the reflections on the rock in the photo above, taken at the Columbia River Gorge in Oregon.

Polarizing filters work best when you’re shooting at a 90 degree angle from the sun, so they won’t do much good for you if you’re shooting directly at the sun or if the sun is directly behind you.

And, make sure you turn the ring on the filter until you get the best looking results.

#3 – Neutral density filter (2 stop)

The neutral density filter simply reduces the amount of light coming into your camera, so it’s helpful when you want to get longer shutter speeds.

Here’s an example of a scene where this filter is helpful:
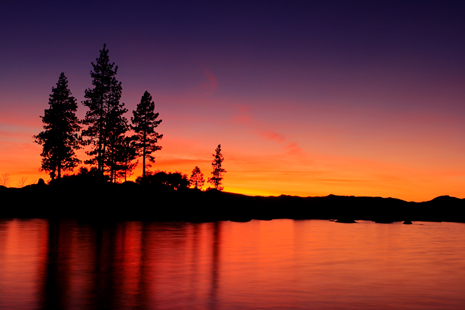
Photo by Steve Berardi

Photo by Steve Berardi

The photo above was taken at Lake Tahoe, Nevada. Since the sun had just set, it was still pretty bright out, but I wanted a photo with smooth water, which required a longer shutter speed. To get this longer shutter speed, I had to reduce the amount of light coming into my camera (the job description of the neutral density filter).

Some photographers prefer a 1-stop ND filter, but personally I like the 2-stop because I feel like the 1-stop isn’t strong enough. If I only need to stop down one stop, then I’d rather do something else, like use a smaller aperture.

#4 – Compass

A compass can help you determine where the sun will be at sunrise/sunset, which will tell you if that wonderful golden light will be shining on that ridge or that mountain peak, or whatever you want to capture!

To figure out the azimuth of the sunrise/sunset, you can use The Photographer’s Ephemeris.

#5 – Flashlight

Since that golden light only occurs at sunrise or sunset, you’ll find yourself hiking in the dark very often. Bring a flashlight for safety, so you don’t end up tripping on something! Headlamps work great too.

There’s been numerous times where I’ve forgotten a good flashlight and had to hike back in the dark, carefully. One time I just used my cell phone as a flashlight (you might want to checkout that brilliant iPhone flashlight app).

Or, better yet, just bring a sleeping bag and tent and spend the night at your photo location! Wake up early for a beautiful sunrise :)

What did I miss?

Is there something else you carry that helps you as a landscape photographer? If so, please tell us about it by leaving a comment below. Thanks! :)

Get more great tips in our free weekly newsletter.


steveb2About the Author: Steve Berardi is a naturalist, photographer, software engineer, and founder of PhotoNaturalist. You can usually find him hiking in the beautiful mountains and deserts of southern California.

Related posts:

  1. Why You Shouldn’t Carry Too Much Gear
  2. The Perfect Backpack For a Hiking Photographer
  3. What To Photograph On An Overcast Day

More about5 Things Every Landscape Photographer Should Carry At All Times - PhotoNaturalist

Photoshop Tutorials: WebZap Review: Create 960 Grid Layouts in a Zap

Photoshop Tutorials: WebZap Review: Create 960 Grid Layouts in a Zap

Link to Photoshop Tutorials

WebZap Review: Create 960 Grid Layouts in a Zap

Posted: 02 Nov 2012 04:06 PM PDT

What is WebZap?

WebZap is a Photoshop addon that lets you create web layouts fast. In fact, we were able to create a wireframe/mockup of our layout in minutes! This is one of our favorite Photoshop plugins for web designers and we’ll show you why.

Easy Installation Through Adobe Extension Manager

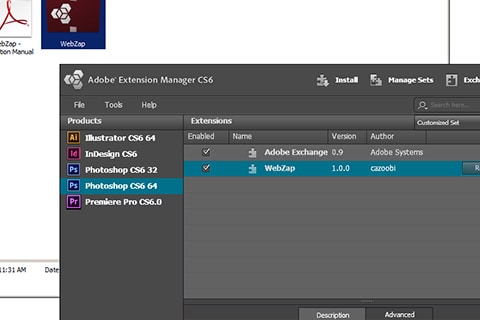
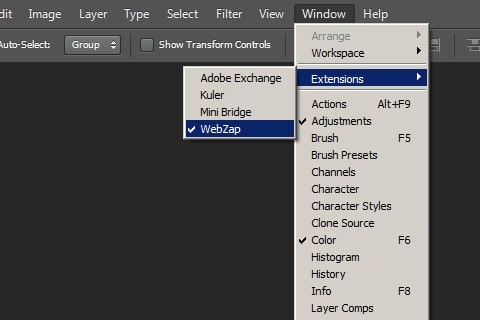
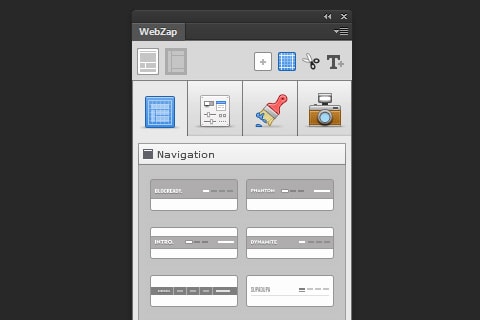
Installation is easy and WebZap does it right by doing it through Adobe Extension Manager; a convenient way to add/remove extensions for your Adobe products. This also means that you need Photoshop CS5 or newer to use WebZap. Once you have WebZap installed, you can access it from the Window > Extensions > WebZap menu. WebZap appears as a panel in Photoshop.

The WebZap Panel

image.png

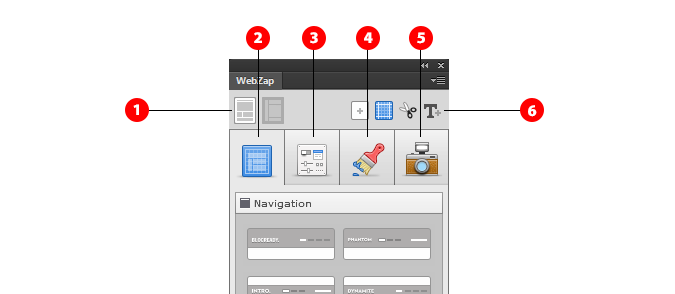
1.  Select a layout. There are two types of layouts you can pick from and it is mainly based on where you want your navigation to be located (top or left).

2. The Layout tab lets you add a navigation, a feature area, and content.

3. Once you have your layout designed, the UI tab lets you add buttons, forms, and sliders easily. All of the items will appear as vector layers which means you can change the size and shape using Photoshop’s path tools.

4. The styling tab allows you to change the color, font, and other style features.

5. Finally, when you’re done with your layout, you can preview it with these auto-generating mockups.

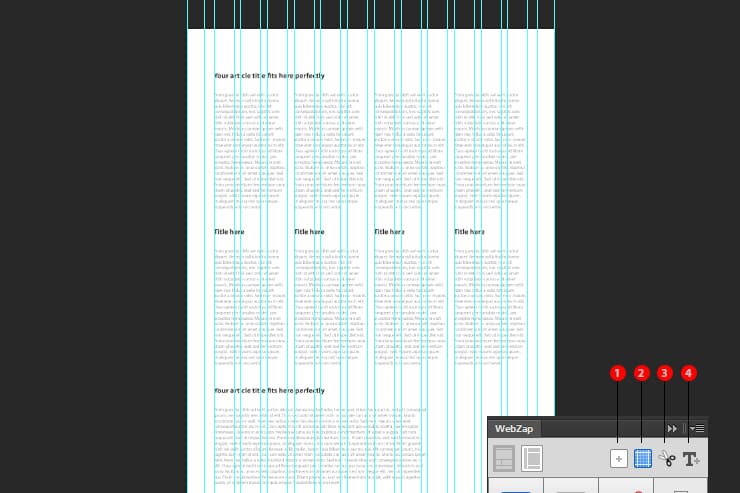
4. This toolset area lets you create a new blank page, add layout guides based on the 960 grid system, snip your design into smaller parts, and create placeholder text layouts.

Creating a Layout

I started WebZap skeptical about how useful it’ll be. But I was wrong. WebZap created a template with a logo, navigation, and fake-content automatically with just one click. All their templates conforms to the 960 grid system and the template elements are organized into groups with editable layers.

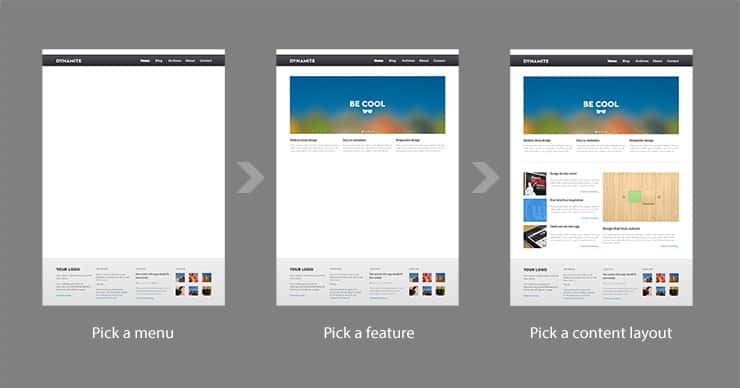
You start off by choosing whether you’d like to create a template with the menu on the top or on the left. Once that is selected, WebZap will present you with 14 header or 9 sidebar navigation styles to choose from. Next, you choose the feature area. Finally, you complete it with a content layout to show in the fold. In 3 simple steps, you’ve created yourself a homepage layout.

pick-menu-feature-content-layout

Editing the Layout

WebZap comes with a good number of premade layouts/styles and it doesn’t stop there. The layouts are organized into layer groups with vector shape and text layers. This means you can easily edit text and alter shapes (ex. backgrounds, buttons, etc.) nondestructively. One caveat is that if you rename the layer groups, WebZap will not update the content when you select a new style. This is because WebZap relies on the layer group names for identification. Instead, you will get a new layer group with the new content.

webzap-layers

Adding UI Elements

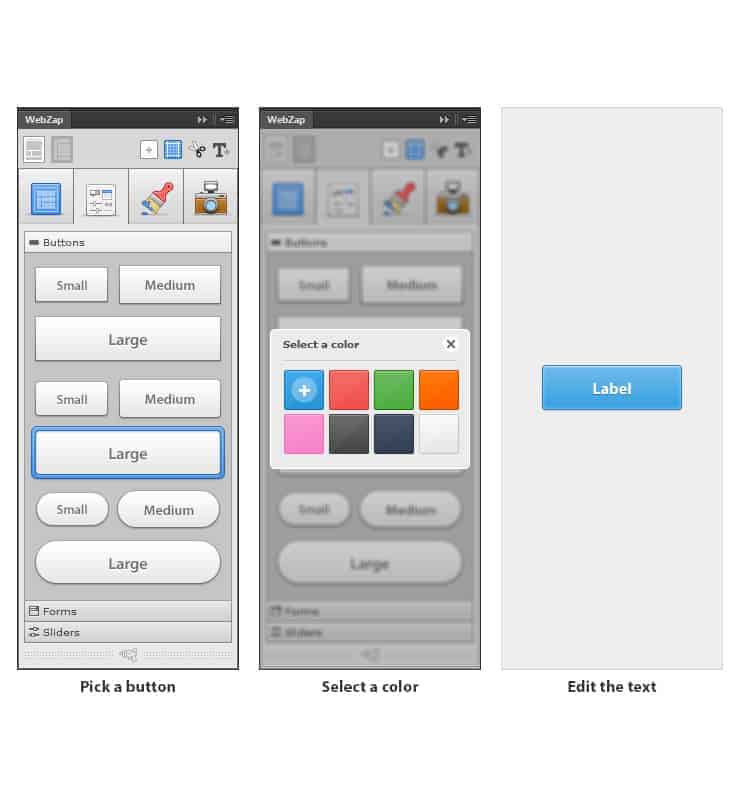
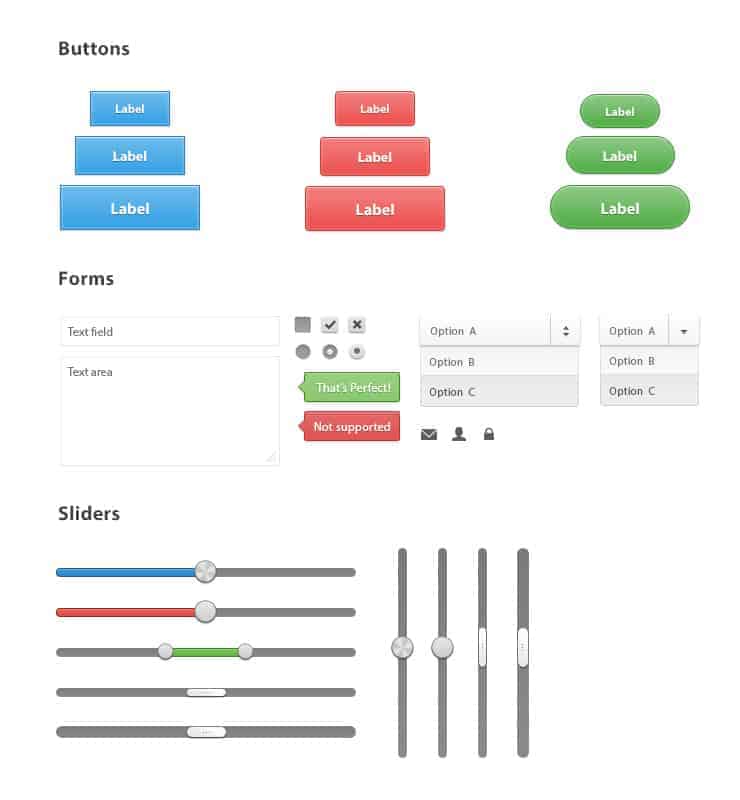
Asides from creating quick web layouts, WebZap also lets you create quick buttons, forms elements, and sliders. There are the 3 common button shapes, 15 form elements, and 5 slider styles. Adding them is as easy as clicking. To edit them, you need to know how to edit layer styles and vector paths. Some UI elements let you customize the colors while others don’t.

Styling the Template

In the styling tab, you can change the style and color for the frame, dividers, and text. They’re all perfect albiet the text styles. This area lets you customize the font styles for the header tags (h1, h2, h3, etc.) and it works great as it is, but we wished they used the new paragraph/character styles feature found in Photoshop CS6.

Creating Mockups

Once you’re happy with your design, you can create mockups of your template in the preview tab. WebZap comes with 8 Apple-centric mockup styles:

  • 6 desktop browser mockups in different angles
  • 1 smartphone mockup
  • 1 tablet mockup

Getting around the flattened mockups

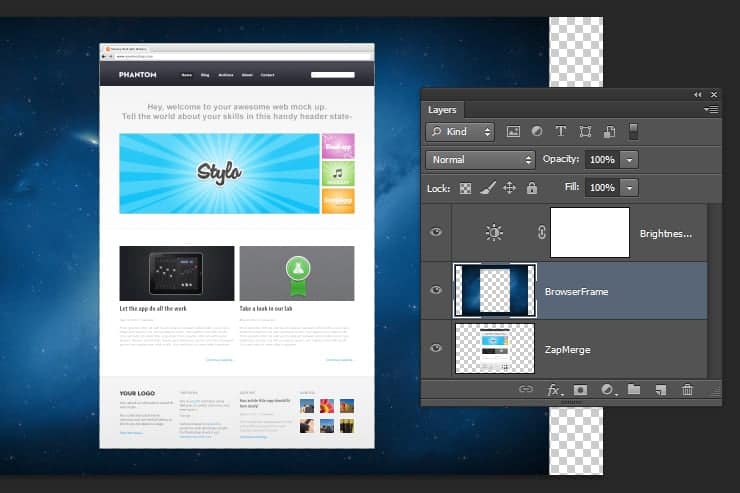
While these are easy to use, we don’t see ourselves using it much. We’re hoping that in future updates, WebZap will come with more customizable mockups. The mockups are a flattened image but it is very easy to get around. Simply undoing a step (Ctrl+Z) will reveal a Smart Object. Double-clicking that Smart Object will reveals the layers.

mockup-layers

Additional Tools

WebZap comes with additional tools that let you create a new 1100x1550px document (1), add layout guides based on the 960 grid system (2), snip layers/groups for easier PSD to HTML conversion (3), and generate Lorem Ipsum text layouts (4).

webzap-mini-toolset

Verdict: A must-have Photoshop extension for Web Designers

WebZap feels and works like a Photoshop action set organized in a panel. It comes with the most common layouts and creates them in editable vector shape and text layers.  It’s so easy-to-use that any beginner will figure it out, but you still need to understand the basics of the 960 grid system and how to edit vector shapes & styles. WebZap isn’t meant to replace your web design process – it’s meant to compliment it. Use WebZap to a quick wireframe then refine it with your own Photoshop skills.

We wished WebZap had an option to use Photoshop CS6′s Paragraph/Character styles instead of their own system and we’re hoping for to see more layout styles and UI elements in their future updates.

The best part about WebZap is that you can mix navigations, headers, content, and amazingly fast. This lets you play around with different layouts to find one that fits your project or generate several layout mockups in minutes so that your client can pick a layout and let you focus on the design. All of this for only $15

Get WebZap - $15


More aboutPhotoshop Tutorials: WebZap Review: Create 960 Grid Layouts in a Zap

Guide to Use Autofocus System on Digital Camera

Autofocus on Intelligent camera lens continue focus on the subject you shoot, and can mean the difference between a pointy and a missed opportunity. Once you do lots of action photography it is best to find out each nuance of your autofocus system. then This tutorial gonna explain guide to supposed to work autofocus on your digital camera.

On 1985 Minolta launch first autofocus SLR camera and have become a revolutionized the world of photography - the Maxxum 7000, except for a short period of time. At that time my eyes were faster and additional accurate than the combination of camera and lens as possible. fast forward to 2012 and there's no method I could return to manual focus. however despite the wonderful advances in today's bodies and lenses, several photographers don't recognize all AF functions to take advantage of current models. I do lots of action and bird photography therefore it was for me to find out all the nuances of my autofocus system. read on to get the most effective of you.

Set the right point of focus:

There is alittle square which is the active focus point within the viewfinder. In most cameras, after you press the shutter button and move the switch on the rear of the body, the point of focus to be moved. E 'is imperative that this approach is that the focal point of the subject, particularly if it's to work in low lightweight conditions with the goal wide open. as an example, if you're writing an image of a pregnant lady and also the centrality of the abdomen, is likely to face to the depth of field when the lens is open. Shift attention from his face and the fire. Ever mindful of the focal plane to be crucial and move the focus point  to that location.


Continuous or single

Several cameras provide a possibility for the user to override the autofocus system if the image isn't focus. it's a continuous release / power / release priority etc - depends on the brand cameras you've got. Continuous mode works well in subjects moving erratically within the viewfinder. i use it all the time, if you shoot at any moving object. the idea is, though you'll get blurry pictures is the autofocus system in step with the movement and sharp pictures. the choice could be a single mode if allowe shutter speed when the camera detect sharp focus. If the subject doesn't move, it works fine. All of my image for portraits and wedding during this mode. within the case of a single mode, the camera determines if the shutter can be released and in Continuous the photographer overrides the decision of the camera.

Start Far and Let it Happen

If the action is delivered to you on this subject, block onto the subject it’s far away. In continuous mode the camera will follow the speed with which the subject moves to "learn" and with their pace. As part widens taking in frame. don't stop till it's cropp important parts of the subject. I do that all the time when i am photographing birds in flight. If you recognize where the action is executed, focusing before  on an object at the same plane therefore the lens doesn’t have far to search when the subject appears.

The central AF point is the best

For action shots, always lock using the central AF point. however they're also in continuous mode and choose an average variety of ranges. the reason why the center is by far the foremost delicate point of the system. In continuous mode, since the subject is approximately, then I compose the image so that the subject isn't dead center within the frame. Beauty is usually "hands off" the tracking to different focus points whereas I recompose the subject. It takes observe to do the recomposing, however it’s well worth the effort and result.


The limitation of the lens

A series of AF lenses have a Limit Focus. If you recognize the subject won't be in your area, make certain to set the target for the marker to infinity. the explanation for this is that when the subject is out of focus whereas tracing, unnecessarily attempt the  entire range of AF lens system. as a results of relocking the new one is far more efficient. The AF switch is sometimes found on giant telephoto lenses.


Turn Off Stabilization

Image stabilization work excellent when it's required, however several photographers who have it all the time. you do not need all the time for two reasons:

a) if the action is triggered, you may use a fast shutter speed. The shutter speed causes every camera movement. All it does is through gyroscopes and eats the battery.

b) The image stabilization system can slow down the AF a little. "If the action is moving fast, i need the AF horsepower I can get so I leave it off.

Integrating the above techniques in your workflow and look forward to many additional keepers within the future.

Article Resource : http://www.takegreatpictures.com/
More aboutGuide to Use Autofocus System on Digital Camera

Guide to Extreme Shallow Depth of Field

Guide to Extreme Shallow Depth of Field What Depth of Field is ?

DOF  or depth of field  is an abbreviation for an outline of what proportion of your image is in focus. A depth of field means simply that a specific area of the image is tack sharp, whereas different parts stay unclear.

Depth of Field in your Photographs

One of the most uses of degrees of freedom is to focus on the topic, reducing the impact of disorder of the bottom annoying. These may also be used in the majority types of photography, portraits, sports, photojournalism, close to macro and use of all the shallow DOF. Personally i prefer the effect, such that nearly never take an image that doesn't use some kind ofthis method. the essential rule is that if you wish look great, use shallow depth of field .

Get Shallow Depth of Field

To get a Shallow Depth of Field  is to set the f-stop as small as possible. the smaller the aperture f-stop will be greater, the larger the aperture the background will appear blurred, so the best way to shallow dof by starting at the lowest f-stop. began by experimenting on the f-stop is by putting the lowest f-stop, then take a picture, then raise one stop, and take a picture again, then you can compare the results, the experiment will facilitate you to understand the Shallow Depth of Field . other things that influential is the ISO, the higher, the lower the depth of field  on the image, so it set the ISO as small as possible, in this case the aperture is the most important thing to be set.  

Use  Shallow Depth of Field

The most common and easy way to use shallow depth of field  is bring the foreground part into focus and blur the background. a nice example of this can be the image below.

Guide to Extreme Shallow Depth of Field

Whereas the vast majority of the image is out of focus you are eyes are immediately drawn to our webbed friend. If our background were in sharp focus he would be immediately lost within the background. after all every photograph is completely different for each scenario however the essential plan is to get all or most of your subject in focus and the maximum amount of your background out of focus as possible. now there are cases where you simply wish to isolate a particular part of your subject to bring importance to it as within the 2nd image to the correct. during this example the area of focus is the sharp looking edge of the flower, at the same time the main body remains blurred.

Guide to Extreme Shallow Depth of Field

This brings immediate attention of your viewer to the part we want to indicate, the sharp edge in this case. you can realize as time goes on that you will get better at identifying when to use DOF and how much to use it. keep in mind if overused it will distract from the whole image, you do not need a complete blur. Another less common use for shallow Depth of Field is to own part of the foreground out of focus, then sharp subject, then out of focus background. this can be one of the most effective techniques if used properly. The result it gives is one of clear separation between the elements of the photo and when interpreted by the mind it really adds to the realism of your two dimensional photograph.

Shallow Depth of Field in Photojournalism and Portrait

Guide to Extreme Shallow Depth of FieldPortrait photography and photojournalism are some of the major styles of photography you want to use shallow Depth of Field . This is a useful tool for telling stories and, as in all other uses, which draws attention to the desired position. Imagine a natural environment where a person chooses a river, sniffing with a smile on his face as a kid. It may have little depth of field in many ways to use here, and it is likely that both the flower and some or most of the face in focus, for example, 2/3rds of a look. This effectively says, "Hey, put your attention on the interaction, forget the rest.Another way would be to move the only flower in the center and let the person as a blur in the background, probably a nearly opposite straight. the example is that of an abstract and artistic history. a final interpretation might be to put an end to the flower in the foreground and the feeling that the person is experiencing. This lends itself to a ratio of image interpretation.

Shallow Depth of Field in Abstract Photography

Guide to Extreme Shallow Depth of Field
An important aspect of the applications may be blurred or surreal. With a goal of good quality and an eye for art in nature, you can really find a way to distort reality and put your mind in the picture. I do not go too deep, because this is the area where you should determine what is happening. Some techniques are only elements combine to present a sort of photographic oil painting as an example the picture on the right side. You also get a good effect for high-contrast patterns in the background, like sunlight through the leaves with a fast track in the foreground as a flower or a super-model in the way you like.

During your experience in photography you will presented with many tools and techniques to tell your stories. Although it is not the only way to tell a story, I think you will find that the depth of field is one of the most useful techniques you really need for almost style in photography.

Related Article :


Article from http://www.emmettlollis.com/
More aboutGuide to Extreme Shallow Depth of Field